Friday, 25 January 2013

Folksy Friends Part 2

Here is the long awaited second part of my Folksy Friends series, to celebrate the work of my fellow Folksians who have supported me through advice and friendship.

This Friday I am showcasing the work of some of the lovely jewellers on Folksy. Please click on the shop name to visit them.

Midnight Star Designs


Colleen makes such intricate jewellery and I love it so much that I bought my mum a necklace from her for Christmas- my mum loves it too! I particularly like Colleen's fun hand stamped bracelets and would love to try this technique sometime.

Creative Treasures


Teresa creates the most wonderfully detailed beadwork pieces and has recently ventured into making her own polymer clay beads and canes. As always she has shown immense talent and aptitude at this.

Abyjem 


Faith uses lampwork beads and semi precious stones to complement her silver smithing skills. She creates beautiful pieces and I have a soft spot for her rings, having bought a gorgeous one for myself once which always gets compliments when I wear it.

Marthamoo Beads


Lindsay makes colourful beaded jewellery and wire wrapped rings, along with cute little felt creations. Here's one of my favourites, a gorgeous millefiori bead made into a ring- fab!

Beadstorm Jewellery


Sue makes pretty jewellery using a wide variety of beads, including glass, semi precious and shell. I love her haematite designs- they are very distinctive and unique.

Adien Crafts


Diane makes the most beautiful jewellery using semi precious and glass beads. She manages to make wire wrapping look so easy- I'm in awe of her skills.

Deborah Jones Jewellery


Deborah is the most amazingly talented silversmith and I love her creations. She adds beads of glass and semi precious stone to create an earthy organic look. One day I'd like to be a silversmith too......

I hope you have enjoyed my celebration of my Folksy jewellery friends. Have a lovely weekend and stay warm.

Monday, 21 January 2013

Ice Flowers

A bit of creative fun today to make the most of this cold weather.

First pick some winter flowers and leaves, collect a jar lid or small bowl, some string and some water.


Arrange your flowers in the bowl or lid.


Pour the water in and push the flowers gently under the surface.


Then put the string in the water, leaving a loop at the top.


Put the bowl or lid outside in the cold over night.


In the morning remove the ice from the bowl -you may want to place it in a larger dish of hot water briefly if it's frozen solid. Hang your pretty ice flower from a snowy branch. Beautiful!


Enjoy the snow and stay safe and warm!

Monday, 14 January 2013

Designs and Inspirations

I seem to spend quite a bit of time on various handmade websites and I often wonder how other crafters and artists go about designing- what inspires them and what processes do they go through to get to the finished piece?

I usually let the beads lead me. I'll choose a focal bead or two, then have a good old rummage through my bead box for similar or contrasting colours. I usually have in my mind the type of piece I am creating- a bracelet, necklace, earrings. I play with the beads and put aside any that don't fit with the overall look. Once I have laid my beads out in a pleasing design I decide how they will be connected- will it be a chain, waxed cotton, wire linked? Then it will be measured, including clasps etc. My eagerness to start making has often resulted in a bracelet that has ended up too big, or a necklace that doesn't sit where I want it to so measuring before starting is important.

Designing A Loveliness of Ladybirds


Watching a nature programme I learnt that the collective name for a group of ladybirds is a "loveliness of ladybirds". I was inspired then to make something using a red Czech ladybird bead I have had in my bead box for a while and as I love making bracelets I thought I would design one around the ladybird.

After rummaging and sorting I laid my design out in different ways.


My favourite is the mixed green and red one.

Sometimes things don't go to plan and I wasn't really loving any of them enough to make it, so I decided to see how it would look as a necklace.


Feeling happier with this I set about making, wire wrapping the beads to the chain to make it strong.
 Once finished I always look to see if it needs any extra embellishment. In this case I bought some tiny red ladybirds to replace the white ones and added a little red bell flower above the ladybird.

And here is my loveliness of ladybirds.


beady daze


What are your inspirations and design processes? 


Friday, 4 January 2013

Folksy Friends Part 1

I'm very excited to publish my first ever Folksy Friday blog. I thought I'd dedicate it to the people on Folksy who have supported me through  friendship, advice, help, promotion and general all round loveliness!

I hope to be doing these each Friday through January, so if you're not here I haven't forgotten you!

I'll start with some of the lovely daily listers, this month known as the January Jollies and what a jolly lot they are :)
Click on the shop names to see more.


Natalie from NOfkants Curios has many different crafting talents and runs the daily listing club. Thank you for supporting us all!


Linda from Uniquely Yours writes a fantastic blog and has often featured items from my shop, so now I can return the favour.


Stef from Jays Monkey makes cute quirky jewellery, usually with a bunny on it and paints animal portraits too.


Shirley from Whimsy Woo Designs sews fabulous covers for books, ipads and any gadget you may own.


Susan aka Dottie from Dottie Designs creates amazing books and boxes which can be personalised for all occasions.

Finishing with something new from my folksy shop Beady Daze.


More Folksy Friends next Friday!

Tuesday, 1 January 2013

16 years of bottoms.....

and paws, children and friends, food and drink, paint and play-doh have left my chairs looking the worse for wear!


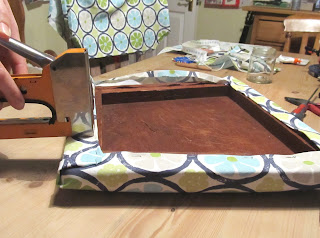
These old oak chairs have been part of my life since childhood. Relegated to the loft in the 1980's and then given to me for my flat in the 1990's I painstakingly stripped the dark brown varnish off and limed the oak to reveal its true beauty. I then re-covered them in a lovely blue chequered fabric. They've needed some new covers for a while now so last week I finally got on with it!

Tools needed for a simple re-cover- staple gun, staple remover/screw driver, pliers, sewing scissors, fabric.


Remove the old covers- a bit of child labour here!


Use the old cover as a template to cut your chosen fabric- mine is Clarke and Clarke's "Energy" in vibrant lime and turquoise.


Staple the opposite sides and tuck in the corners.


Looking much better!


Repeat 4 times and I now have chairs to be proud of!


This is what my blog will be about- all the jobs I have been meaning to do but haven't got around to!
Happy New Year.

Saturday, 22 December 2012

My Resolution

I'm starting my New Years Resolution early by creating a blog! A good start to 2013!
It will be about my life with 3 boys, 2 guinea pigs, 1 cat, my husband, my house and my bead box. I have lots of ambitions for the year, and I hope to share them with you.

In the mean time, Merry Christmas and a Happy New Year to all!